

Invoicing customers
Last updated:
There are 3 ways to create invoices from SortScape:
-
You can create, send and manage invoices directly from inside of SortScape without connecting to Xero or QuickBooks Online.
-
You can connect to Xero and create / send Xero invoices from inside of SortScape.
-
You can connect to QuickBooks Online and create / send QuickBooks Online invoices from inside of SortScape.
Many invoicing settings — including due dates, invoice numbers, and invoice templates — depend on which of these options you use. If you are not connected to Xero or QuickBooks Online, you are using SortScape’s built-in invoicing and those settings are configured in SortScape (see Setting invoice due dates and Setting invoice numbers).
You can only use one invoicing method at a time. If you need to change from Xero to QuickBooks Online, move to SortScape built-in invoicing, or switch the other way, see Switching invoicing method.
Create an invoice
Section titled “Create an invoice”Quick guide
Section titled “Quick guide”Log in as an administrator and make sure invoicing is set up for your account. Requires invoicing must be turned on for the job. If it is off, Create invoice is not available, and the completed job will not appear in the pending invoicing list or prompt you to invoice it.
Choose the path that matches what you are billing:
- One or more completed jobs: Open Invoicing and select Completed (Xero or QuickBooks Online) or Jobs pending invoicing (SortScape built-in invoicing). Select the jobs, click Invoice, then complete the Create invoice form. To invoice jobs for more than one billing contact in one go, use Bulk invoicing.
- One completed job: Open the job from Schedule. If needed, click Complete first. Then click the primary Create invoice button.
- One job before work is complete: Open the job from Schedule, click the ⋮ menu next to Complete, then select Create invoice.
- Several jobs on the schedule: Select the jobs in a job run, then open Actions → Invoice. See Bulk invoicing.
- No job, or completed jobs for one contact (experimental): If standalone invoices is enabled, open Invoicing → Invoices and click Add invoice, or click + in the top bar and choose Invoice. You can leave the job picker blank, or select one or more completed jobs for that billing contact. See Standalone invoices.
Common mistake: Invoicing → Invoices shows invoices you have already created. It does not show jobs waiting to be invoiced. Switch to Completed or Jobs pending invoicing to invoice completed jobs from the pending list. To create an invoice from the Invoices tab (with or without jobs), see Standalone invoices.
From the Invoicing screen
Section titled “From the Invoicing screen”Log in as an administrator and open Invoicing.
The Invoicing screen has two tabs:
- Completed (shown when you invoice through Xero or QuickBooks Online) or Jobs pending invoicing (shown when you use SortScape built-in invoicing). Use this tab to create new invoices from finished jobs.
- Invoices. Use this tab to search, view, and manage invoices you have already created. You cannot tick completed jobs on this tab. If experimental standalone invoices is enabled, use Add invoice to create an invoice without a job, or to pick completed jobs for one billing contact.
Use the Group by dropdown in the top-right corner to organize jobs by property or billing contact. Select the job(s) you want to invoice and click Invoice at the top of the screen, then complete the Create invoice form. If you selected multiple jobs, SortScape combines them into one invoice.
When combining multiple jobs into a single invoice with Invoice, all selected jobs must share the same billing contact. Jobs at the same property always qualify. Jobs at different properties also qualify when those properties use the same billing contact. If you tick jobs for more than one billing contact, Invoice is disabled until you narrow the selection to one contact, or you can use Bulk invoice.
To invoice jobs that belong to different billing contacts in one go, use Bulk invoice instead (see Bulk invoicing). You can tick jobs across contacts, use Select all for the current page, and choose one invoice per contact, property, or job in the preview. The Invoice button still only works for a single billing contact.
To create an invoice from completed jobs:
- Open Invoicing.
- Select the Completed or Jobs pending invoicing tab (not Invoices).
- Use the Group by dropdown to sort jobs by property or contact (billing contact).
- Select the grouped jobs you want on one invoice.
- Click Invoice, then complete the Create invoice form.
If you landed on Invoicing → Invoices and do not see jobs to select, switch to the Completed or Jobs pending invoicing tab.
One invoice for multiple properties
Section titled “One invoice for multiple properties”You can put jobs from more than one property on a single invoice when those properties share the same billing contact. This is common when one landlord or property manager pays for several sites.
- Make sure each property uses the same billing contact. On the property record, set Billing contact to that person or company (see Changing a property billing contact).
- Open Invoicing.
- Set Group by to Group by contact (top right).
- Select the jobs you want across those properties.
- Click Invoice, then complete the Create invoice form.
SortScape’s Invoice button only blocks selection when jobs have different billing contacts, not when they are simply at different addresses. If properties bill to different people, create separate invoices, or use Bulk invoice.
How line items are ordered
Section titled “How line items are ordered”When you invoice one or more jobs, SortScape fills the invoice with line items from those jobs. The starting order is:
- Jobs are grouped by property.
- Within each property, jobs are listed oldest first. SortScape uses the date the job was completed, or the scheduled date if it is not yet complete.
- Within each job, items carried from a reordered quote keep the quote’s order. Other job items appear afterwards, with repeating items first, then by category and name.
Two jobs at the same property in the same month stay as two lines, so each can keep its own date. They are not merged into one line with a quantity of 2.
The quote order is fixed on the job when you schedule the quoted work. Reordering the quote later does not update jobs that already exist, and jobs do not have their own drag-to-reorder control. You can still change the line order on the invoice.
You can change that order on the Create invoice form:
- Find the grip handle on the left of a line item.
- Press the handle and drag the line item to its new position.
- Repeat for any other line items you want to move.
- Create the invoice.
The saved order is used on the invoice, including the invoice sent to Xero or QuickBooks Online. Only the grip handle starts a drag, so you can still click the description to edit the line item or use the cross to remove it.
Nothing changes until you create or save the invoice. If you move a line by mistake, close or cancel the form without saving.
Reordering an invoice does not reorder the Invoice items on its jobs. It only changes this invoice. You can also add, remove, or edit line items before creating it. See Create an invoice.
For a SortScape built-in invoice, you can reorder the lines later by opening the invoice and clicking Edit, as long as the invoice is not marked paid. Invoices already created in Xero or QuickBooks Online must be edited in that accounting system. See Editing an invoice after it has been emailed.
From a job on the schedule
Section titled “From a job on the schedule”To invoice a single job, open it directly from your schedule.
If the work is already done:
- Open the job from Schedule.
- Click Complete if the job is not already complete.
- Click the primary Create invoice button.
If you want to invoice before marking the job complete:
- Open the job from Schedule.
- Click the ⋮ menu (next to Complete).
- Select Create invoice.
Create invoice is available on jobs that are not yet marked complete, as long as you are an administrator, Requires invoicing is enabled, and invoicing is set up for your account. This lets you bill a customer before work is done or before you mark the job complete.
After a job is marked complete, Create invoice also appears as a primary button on the job.
Invoicing before work is complete
Section titled “Invoicing before work is complete”If you invoice a job before marking it complete, keep in mind:
- The Completed or Jobs pending invoicing tab only lists completed jobs. You cannot bulk-invoice multiple incomplete scheduled jobs from that screen. You can invoice incomplete jobs from the schedule with bulk invoicing instead: SortScape marks them complete when the invoices are created.
- For time-and-materials jobs, line items may still show estimated hours until the job is marked complete and actual time is logged.
- Checklist items only transfer to the invoice when marked Work done.
- Once invoiced, the job is locked. You cannot change logged time, materials, or line items unless you remove invoice status.
See also Can I invoice customers before work is complete? for advance billing and bulk scheduled-job scenarios.
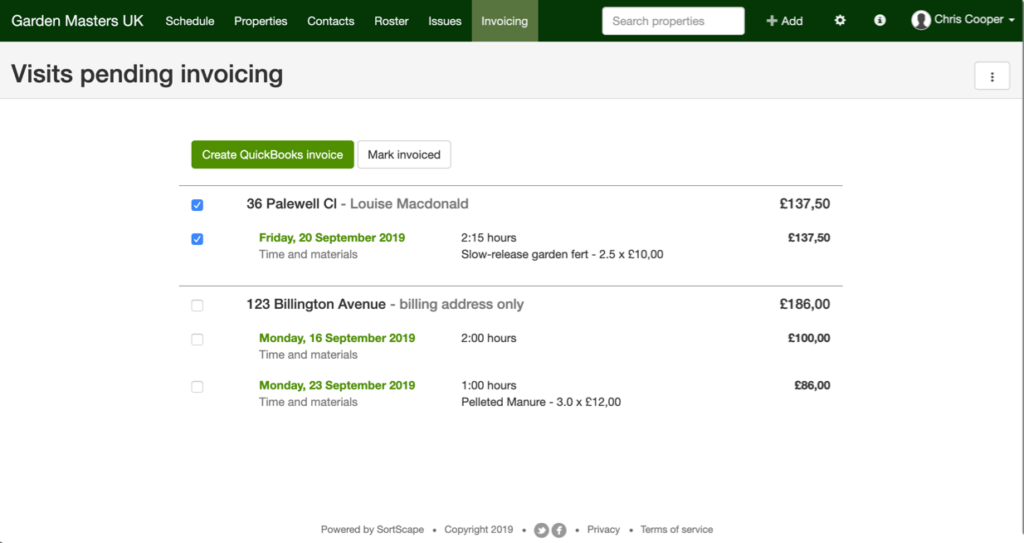
Select the job(s) you want to invoice and click “Invoice”. Use “Bulk invoice” to bill more than one contact at once.
SortScape shows a Create invoice preview with the job’s line items pre-filled before you submit the invoice. The line items come from the invoicing basis you set for that job (see below). On this screen you can add, remove, or edit line items and other invoicing details before you submit the invoice.
Line items you add only on this preview are saved on the invoice and sent to Xero or QuickBooks Online. They are not added back to the job. They will not appear when you reopen the job or in Property history on the property screen. They also do not count in schedule day, week, or month Value totals.
To have a line item show on the job and in the schedule totals, add it to the job’s Invoice items before you click Create invoice. See One-off charges on a single job.
By default, the invoice uses the billing contact set on the property. You can select a different billing contact when creating an invoice, and optionally save that choice as the new property default.
If you need help deciding who should be the service contact vs billing contact (for example rentals, strata/body corporate, or HOA setups), see Setting up service and billing contacts for rentals, strata, and HOAs.
What each line item description says
Section titled “What each line item description says”SortScape writes each invoice line description from a set pattern when you click Create invoice. It does not copy what you see on the job word for word.
By default:
- Invoice items on the job (for example a mow or materials): the job date, the item’s description from your Items catalogue, then any note on that line.
- Hours logged, when the job is charged hourly based on time logged: the job date, “Hours for” and the employee’s first name, plus any notes on their time entries. Each employee gets their own line.
- Hours logged with Combine hours into one line item turned on: the job date, your name for hours (for example Labour) and the job’s Work done. Employee names are left out.
- When one invoice covers jobs at more than one property, the property address is added to each line.
On the job, a note you add to an item shows in place of the item’s description. On the invoice, the note comes after the item’s description. So if an item’s description is a placeholder (for example “(Insert client here) general gardening service”), every invoice line for that item starts with the placeholder and your note follows it. To fix it, change the item’s sales description to something short that reads well in front of your notes (for example “Gardening:”). A blank sales description is replaced by the item name, so it will not remove the text. Change it in the Items catalogue, or if you use Xero or QuickBooks Online, change it there and then sync.
The number of hours goes in the quantity column, not the description. Logged time only becomes an invoice line when the job is charged hourly. On a fixed price job, the hours you log stay on the job and are not added to the invoice.
To change one invoice, edit the line on the Create invoice preview before you submit it. To change the wording on every new invoice (for example to show the employee’s full name or the service contact’s name), contact SortScape support. The change applies to invoices created after that and does not update invoices you already have.
If “Create invoice” is missing for a job
Section titled “If “Create invoice” is missing for a job”If you cannot see Create invoice on a job, check the following:
- You are logged in as an Administrator (employees and contractors cannot create invoices).
- The job has Requires invoicing enabled.
- Invoicing is set up for your account (built-in invoicing, Xero, or QuickBooks Online).
A job does not need to be marked complete before Create invoice appears in the job ⋮ menu.
If Requires invoicing is turned off, that job is treated as non-billable and won’t show invoice actions. To invoice it, edit the job, enable Requires invoicing, set the billing type and line items, then save.
Remove a job from Jobs pending invoicing
Section titled “Remove a job from Jobs pending invoicing”The Jobs pending invoicing tab lists completed jobs that still need an invoice. These are jobs, not invoices, so there is no delete button on that list.
To stop a job appearing there:
- Open the job from the list or your schedule.
- If the job is already marked complete, click Reopen first. Completed jobs cannot be edited until they are reopened.
- Click Edit.
- Under Invoice settings, turn off Requires invoicing.
- Save the job.
- If the work was already done, mark the job complete again.
The job will drop off the pending list.
If this is a repeating job and the customer should not be invoiced going forward, turn off Requires invoicing on that job so later jobs in the series are non-billable too. See Make a repeating job non-billable.
If you cannot click Edit on the job
Section titled “If you cannot click Edit on the job”These steps are for the job, not the invoice. If you are looking for Edit on an invoice and it is not there, the invoice is in Xero or QuickBooks Online. See Editing an invoice after it has been emailed.
- The job is completed or skipped: click Reopen, then Edit.
- You are a Contractor: contractors cannot edit jobs. Ask an Administrator or Employee to make the change.
- Employees can edit jobs. You do not need Administrator permission only to turn off Requires invoicing.
Clear several jobs from the pending list at once
Section titled “Clear several jobs from the pending list at once”The pending list is completed work waiting to be invoiced, so the fastest way to clear it depends on what you want:
- You want to bill the work: on Invoicing → Jobs pending invoicing, tick the jobs and click Invoice. Jobs that share a billing contact combine onto one invoice. If the jobs belong to different billing contacts, click Bulk invoice instead (see Bulk invoicing).
- The work was already paid (cash) or you do not want a SortScape invoice: tick the jobs, click the arrow next to Invoice, and choose Mark invoiced. Enter a label such as
cash. This clears them from the list without creating an invoice or a payment record. See Clear a cash job without creating an invoice. - The jobs should never be invoiced: turn off Requires invoicing on each one (see the steps above). There is no bulk option on the pending list, so do it per job. For a repeating series you only need to edit one job: that change applies to later jobs in the series. See Make a repeating job non-billable.
Does Skip remove a job from the pending list?
Section titled “Does Skip remove a job from the pending list?”Yes, indirectly. The pending list only shows completed jobs, so a skipped job does not appear there. You can only skip a job that is not yet completed, so to skip one that is already on the pending list, click Reopen first, then Skip. Only skip a job if the work did not happen. If the work was done, invoice it or use Mark invoiced instead.
Check for missed invoicing
Section titled “Check for missed invoicing”Use the Jobs pending invoicing tab on the Invoicing screen when you want to review completed jobs that still need an invoice. This is where you check whether billable work was completed but not yet invoiced.
- Open Invoicing.
- Select the Jobs pending invoicing tab.
You can also open the same list from the Pending invoicing card on the Dashboard (administrators only). See Dashboard.
If you need completed job details in a spreadsheet (for example, work done, hours, or invoicing status), use Invoicing → ⋮ → Export completed jobs. See FAQ - How do I export job information for a specific customer?.
Recording cash payments
Section titled “Recording cash payments”How you record cash depends on whether you need the money in SortScape’s paid totals, or you only need to clear the job from pending invoicing.
To remind your crew which jobs are paid in cash before they go, tag those jobs with the 💵 cash tag. See Flag jobs where cash has to be collected.
Record cash as a payment
Section titled “Record cash as a payment”If you use SortScape’s built-in invoicing, create the invoice and use Record payment. This adds the cash to the invoice payment history and the Sales and tax report Payments received totals. See Recording invoice payments for the steps.
If you invoice through Xero or QuickBooks Online, create the invoice from SortScape, then record the cash payment in Xero or QuickBooks Online. Use that accounting system’s reports for payment and tax totals.
Schedule day/week/month Value totals still use each job’s invoice items, not the invoice total or payments received.
Clear a cash job without creating an invoice
Section titled “Clear a cash job without creating an invoice”Use this when the customer already paid on site and you do not want a SortScape, Xero, or QuickBooks invoice. This only marks the job invoiced in SortScape. It does not create a payment and does not appear in paid or payments-received totals.
- Open the job from the schedule, or select it on the Invoicing screen.
- Click the arrow next to Create invoice (or Invoice on the pending list).
- Select Mark invoiced.
- When prompted for an invoice number, enter cash (or another label such as
Cash - paid on site).
Nothing is sent to Xero or QuickBooks Online. Use Mark invoiced only when you do not want an invoice or payment record created in SortScape or your accounting system.
If the job should not require invoicing at all, turn off Requires invoicing instead (reopen the job first if it is already complete). See Remove a job from Jobs pending invoicing.
Applying discounts
Section titled “Applying discounts”SortScape does not include a separate discount field or percentage on invoices. To reduce the invoice total, add a line item with a negative unit price and set the quantity as needed. Use a clear description so your customer understands the adjustment, for example “Loyalty discount” or “Promotional discount”.
You can add a discount line item:
- On the Create invoice form when invoicing one or more completed jobs.
- On a job’s Invoice items before the job is invoiced (including one-off and repeating line items).
The invoice total will decrease by the amount of the negative line. Tax is calculated on each line item according to your usual settings (see Tax treatment of invoices below).
For example, to apply a $15 discount, add a line item with description “Promotional discount”, quantity 1, and price -15.00.
Entering a negative price on a phone
Section titled “Entering a negative price on a phone”Some Android on-screen keyboards (especially number or decimal keyboards) do not show a minus (-) key, so you cannot type a negative price in the app on those devices.
If your keyboard has no minus key:
- Open SortScape in a web browser (on a computer, or on your phone’s browser if that keyboard can type
-). - Edit the invoice, quote, or job line items as usual.
- Enter the negative price (for example
-10.00) and save.
Negative prices work the same once entered. The limitation is only typing - on some phone keyboards, not the discount feature itself.
Checklist items and invoices
Section titled “Checklist items and invoices”Checklist items represent tasks or services associated with a job. To ensure these items appear on your invoice:
- Navigate to the “Work Required” section where pending tasks are displayed.
- Mark each completed item to change its status to “Work Done”.
- Only items marked as “Work Done” will be automatically transferred to the invoice when you create it. Double-check the completion status of all checklist items before creating an invoice to avoid missing entries in your final invoice. Checklist items marked as “Work Done” during the job are automatically included in the line items on this form. This ensures all completed tasks or services are accurately represented in the invoice.
Sending the invoice
Section titled “Sending the invoice”When creating an invoice, you may see Email invoice or Send invoice text message.
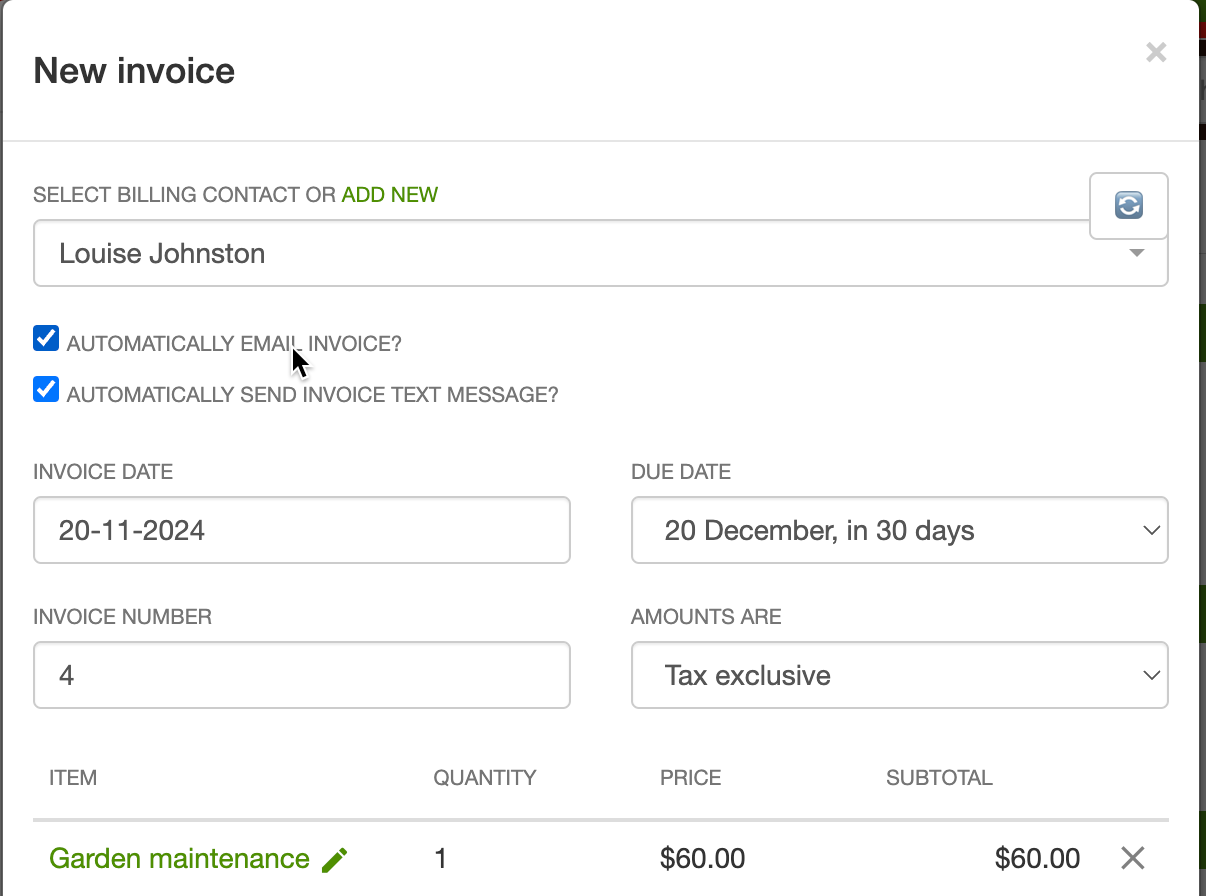
Emailing invoices
Section titled “Emailing invoices”If you tick Email invoice when creating an invoice, the billing contact is emailed as soon as the invoice is created. This box is only selectable if the billing contact has an email address. For Xero, the default invoice status also needs to be “approved” or “waiting approval” on the Xero page.
Who sends that email depends on how you invoice:
- SortScape built-in invoicing: SortScape sends it, using your invoice email template.
- Xero: SortScape sends it only when Email Xero invoices from SortScape is on under Settings → Integrations → Xero. If that setting is off, Xero sends it using your Xero Sales Invoice template.
- QuickBooks Online: QuickBooks always sends it, using your QuickBooks email template, even if you ticked Email invoice in SortScape. There is no option to send QuickBooks invoices from SortScape. QuickBooks only gets the first email address on the billing contact, so any extra comma-separated addresses do not receive the invoice. SortScape sets that address on every new invoice, so changing the customer’s email in QuickBooks does not change who gets it. To reach a second address, open the invoice in QuickBooks Online and add it to the email or Cc field before sending.
The invoice PDF is attached to the email when you use SortScape’s built-in invoicing, QuickBooks Online, or Xero with Email Xero invoices from SortScape turned on. Optional job photos or files you select go on that same email as extra files. They are not added into the invoice PDF, and there is no separate photo email from SortScape. See Selecting attachments and Why is the invoice PDF not attached to the invoice emails?.
To have new invoices always emailed, turn on Automatically email new invoices in Settings → Messaging → Invoice messages.
Sending invoices as a text message
Section titled “Sending invoices as a text message”If you are creating invoices directly within SortScape or Xero, you can also optionally send new invoices as a text message. (Sending invoices via text message is not available for QuickBooks Online customers).
If you click the Send invoice text message checkbox when creating an invoice, SortScape sends a text message to the customer as soon as the invoice is created, including when the invoice is stored in Xero. The text uses your SMS text message credits. This box is only selectable if the billing contact has a primary mobile number specified and, in the case of Xero, the default invoice status is set to either “approved” or “waiting approval” on the Xero page. If the contact has additional SMS reminder numbers, the invoice text is sent to each number and uses one SMS credit per recipient. See Multiple mobile numbers for SMS reminders.
Sending invoices after they have been created
Section titled “Sending invoices after they have been created”If you don’t tick Email invoice or Send invoice text message when creating the invoice, you can still send it later from SortScape for built-in invoices and for Xero invoices.
SortScape built-in invoicing: Open the invoice, then click the email icon or the SMS icon next to the contact. Choose a template, edit the message if you need to, and send.
Xero: Open the invoice in SortScape. The same email and SMS icons sit next to the contact.
- The invoice must already exist in Xero and must not be voided. If it is still a draft, approve it in Xero first, then try again. SortScape will tell you if the invoice cannot be sent yet.
- Email needs Email Xero invoices from SortScape turned on under Settings → Integrations → Xero. If that setting is off, the email icon is greyed out. Turn the setting on, or send the invoice from Xero.
- Text messages do not need that setting. They use your SMS text message credits.
- After SortScape sends the message, the invoice is marked as sent in SortScape and in Xero. The send also appears under Settings → Messaging → Sent messages.
Edit the templates under Settings → Messaging → Invoice messages. Customer emails and text messages must be enabled for the icons to appear. See Managing customer text messages and emails.
To tell the customer their next job in that email or text, add the next_job_date tag to the New invoice template. See Showing the next job on an invoice message.
QuickBooks Online: SortScape cannot send a QuickBooks Online invoice after it has been created. Send it from QuickBooks Online.
To get a copy of emails SortScape sends, see Getting a copy of invoice emails.
Getting a copy of invoice emails
Section titled “Getting a copy of invoice emails”The SortScape CC settings only apply when SortScape sends the invoice email. They do not apply when the invoice is emailed from Xero or QuickBooks Online.
To get a copy of invoice emails SortScape sends to customers, add your address under Email addresses to cc when emailing quotes and invoices in Settings → Messaging → Invoice messages. Separate multiple addresses with a comma.
Those addresses are CC’d automatically on the same email SortScape sends to the customer, including when you email the invoice later. You do not need to tick anything on the send window.
The send window also has Cc sender. That is a one-off copy to the reply-to address for that message (your job email reply-to, or you if reply-to is not set). Leave it unticked if your address is already in the settings CC list.
You still have to email the invoice to the customer. Use Email invoice when creating the invoice, or Email invoice from the invoice later. The CC list does not send the invoice by itself.
CC is email only. It is not added to invoice text messages.
Xero: SortScape sends the email only when Email Xero invoices from SortScape is on under Settings → Integrations → Xero. If that setting is off, Xero sends the email and the SortScape CC list is not used.
QuickBooks Online: SortScape does not email QuickBooks Online invoices after they are created. Send them from QuickBooks Online. The SortScape CC list is not added to those emails.
Invoice status when using Xero or QuickBooks Online
Section titled “Invoice status when using Xero or QuickBooks Online”On the Invoicing screen, each invoice shows a status such as Draft, Sent, Overdue, or Paid. If you send invoices from Xero or QuickBooks Online rather than from SortScape, the status in SortScape still updates, but not immediately.
When you create an invoice in SortScape, it is saved to your accounting system and usually shows as Draft in SortScape until the next status sync runs. SortScape regularly pulls invoice details (including sent and paid status, amounts, and due dates) from Xero or QuickBooks Online:
- Xero: about every 12 hours
- QuickBooks Online: about once per day
Your integration still runs more often (about every 30 minutes) to keep contacts and products up to date. Invoice status is synced on the schedule above to limit API usage.
This status sync does not add or change line items on the job. Job invoice items are set on the job before you create the invoice, or by editing the job after you remove invoiced status.
After a sync runs, invoices you have sent from Xero or QuickBooks Online should show as Sent in SortScape. Until then, seeing Draft does not mean anything went wrong. It just means SortScape has not refreshed that invoice yet. It is normal to see a mix of Draft and Sent if some invoices have synced and others are still waiting.
If you want to update statuses sooner, open Settings → Integrations → Xero or Settings → Integrations → QuickBooks Online and click Sync with Xero or Sync with QuickBooks now. Check back after a few minutes.
How to tell who sent the invoice: SortScape only records emails and text messages it sends itself. Open Settings → Messaging → Sent messages. If an invoice is not listed there, it was sent from Xero or QuickBooks Online, not from SortScape. An invoice can show as Sent in SortScape after a status sync even when SortScape did not send it.
Status sync applies to invoices from roughly the last 120 days. Older unpaid invoices may not show an updated status in SortScape.
If you tick Email invoice or Send invoice text message when creating the invoice, or you send a Xero invoice later from SortScape, SortScape can mark the invoice as sent straight away without waiting for the next sync.
Invoice status after partial payments
Section titled “Invoice status after partial payments”SortScape’s built-in invoices support one or more payments against the same balance. See Recording invoice payments for partial-payment status, balances, and payment history.
Sending payment receipts
Section titled “Sending payment receipts”See Sending payment receipts for invoices for receipt options, online-payment behavior, and Payment received templates.
Note to Xero customers
Section titled “Note to Xero customers”Xero invoices have separate settings for email and text messages:
Email: You can choose how Xero invoices are emailed by enabling or disabling Email Xero invoices from SortScape under Settings → Integrations → Xero:
- When turned ON: Invoices are emailed from SortScape with a PDF attachment included, both when you tick Email invoice at creation and when you email the invoice later from the invoice. The SortScape CC list is added on these emails. Edit the email template under Settings → Messaging → Invoice messages.
- When turned OFF: Invoices are emailed from Xero. The subject and body of these emails are generated using your Xero account’s default Sales Invoice template. Emails sent from Xero do not include a PDF attachment of the invoice, so please make sure your default Sales Invoice template in Xero includes a link to the online invoice. The SortScape CC list is not used. The email icon on an existing Xero invoice is greyed out until you turn this setting on.
Text message: There is no setting to send invoice SMS through Xero. SortScape sends the text itself, using your SMS text message credits. Tick Send invoice text message when you create the invoice, or send it later from the invoice (see Sending invoices after they have been created). Edit the template under Settings → Messaging → Invoice messages. SortScape does not have information on what Xero may charge to send invoices from within Xero.
Who receives replies to invoice emails sent from SortScape
Section titled “Who receives replies to invoice emails sent from SortScape”This applies when SortScape sends the invoice email: built-in invoicing, or Xero with Email Xero invoices from SortScape turned on.
The From address is your business name via SortScape. The Reply to address is:
- Your account Job email reply-to address, if set under Settings → Messaging → Settings, or
- The SortScape user who created or sent the invoice, if reply-to is not set
If an employee creates invoices and you do not want customers replying to that employee, set the reply-to address to a shared inbox under Settings → Messaging → Settings.
If QuickBooks sends the email, or Xero sends it with that setting off, replies stay in that accounting system. SortScape reply-to settings are not used.
For more on email replies, see Managing customer text messages and emails.
Save one invoice to your computer
Section titled “Save one invoice to your computer”This saves that invoice as a file. It is separate from Export on the Invoices list, which downloads a spreadsheet of many invoices.
You need to be an Administrator to open invoices.
Xero or QuickBooks Online
Section titled “Xero or QuickBooks Online”- Open Invoicing and select the Invoices tab.
- Open the invoice.
- Click View PDF.
Use the download button on the preview to save the PDF. SortScape does not make a Word file for a Xero or QuickBooks invoice. You can also click View in Xero or View in QuickBooks and download the PDF there.
SortScape built-in invoicing
Section titled “SortScape built-in invoicing”- Open Invoicing and select the Invoices tab.
- Open the invoice.
- Click the More menu (three dots).
- Click Download PDF or Download Microsoft Word.
Download PDF saves a PDF. Download Microsoft Word saves a .docx file. The PDF icon on the invoice opens the same PDF in a preview, and that preview has a download button too.
For a spreadsheet of many invoices, use Export and then Invoice list (CSV, in the web app). With SortScape built-in invoicing you can also download the Sales and tax report (Excel export).
Editing an invoice after it has been emailed
Section titled “Editing an invoice after it has been emailed”You can change an invoice after it has been emailed. Where you edit it depends on whether the invoice lives in Xero, QuickBooks Online, or SortScape.
A Xero invoice has no Edit button in SortScape. Emailing it does not add one. Edit the invoice in Xero.
- Open Invoicing and select the Invoices tab, then open the invoice. Or open the job and click Show invoice.
- Click View in Xero. SortScape opens that invoice in Xero.
- Change the invoice in Xero and save it there.
You need to be an Administrator to open invoices. Show invoice on a job is for administrators only.
SortScape copies the updated status, amounts, and due date from Xero on the next sync (about every 12 hours). To refresh sooner, open Settings → Integrations → Xero and click Sync with Xero now. See Invoice status when using Xero or QuickBooks Online.
Remove invoiced status on the job only unlocks the job in SortScape. It does not edit or void the invoice in Xero. See Editing time or line items after a job has been invoiced.
QuickBooks Online
Section titled “QuickBooks Online”A QuickBooks Online invoice also has no Edit button in SortScape. Open the invoice the same way, then click View in QuickBooks and edit it in QuickBooks Online.
SortScape built-in invoicing
Section titled “SortScape built-in invoicing”Open Invoicing, select the Invoices tab, and open the invoice. Click Edit. You can do this after the invoice has been emailed, as long as the invoice is not marked paid. The Edit button is disabled once the invoice is marked paid. To change the invoice number, see Setting invoice numbers.
Correct billing contact or address after an invoice is created
Section titled “Correct billing contact or address after an invoice is created”You cannot change the billing contact on an existing invoice in SortScape when you use Xero or QuickBooks Online. Those invoices are managed in your accounting system, not in SortScape. To open the invoice there, see Editing an invoice after it has been emailed.
Invoiced jobs are locked. They do not appear on Jobs pending invoicing until you remove invoiced status. You cannot create a second invoice for the same job while it is still marked invoiced.
The easiest fix is to get billing details right before you create the invoice. On the New invoice screen, use Select billing contact for a one-off change, or update the property’s Billing contact if the default should change. See Changing a property billing contact.
Xero or QuickBooks Online
Section titled “Xero or QuickBooks Online”Once an invoice has been created in your accounting system, SortScape cannot change the billing contact or billing address on that invoice. What you do next depends on your accounting workflow and whether the invoice has already been sent.
For Xero or QuickBooks Online customers, the usual fix is to update the billing address on the contact in your accounting system, or change the invoice contact to a contact with the correct billing details.
If the invoice is already in Xero or QuickBooks Online and you are not sure how to correct it, contact SortScape support.
You cannot edit billing addresses on contacts in SortScape when connected to Xero or QuickBooks Online. Address changes are made in your accounting system and sync back to SortScape.
SortScape built-in invoicing
Section titled “SortScape built-in invoicing”If you use SortScape’s built-in invoicing, you can update an existing invoice directly:
- Open Invoicing → Invoices and open the invoice.
- Click Edit.
- Change Select billing contact if needed.
- Save the invoice.
If the billing contact is correct but the billing address is wrong, open that contact, update the billing address, then return to the invoice.
You can also open the job and choose Remove invoiced status if you only need to unlock the job. See Editing time or line items after a job has been invoiced.
If you want to fully cancel and recreate a built-in invoice, delete it from Invoicing → Invoices → open invoice → ⋮ → Delete. That returns linked jobs to Jobs pending invoicing. The new invoice gets a new number. See Numbers are never reused.
Selecting attachments
Section titled “Selecting attachments”You can add photos and other attachments to invoices. For example, if your employees upload photos of completed work to a job, you can attach those photos to the invoice so they are sent to your customer.
When using accounting integrations:
- In Xero, attachments default to “Send with Invoice”
- In QuickBooks Online, attachments default to “Attach to email”
This allows attachments to be shared with your customer when the invoice is sent.
Important: Attached photos are sent as separate attachments. They are not rendered inside or at the bottom of the invoice PDF.
Those files go on the same invoice email. They are not sent in a second email from SortScape. For QuickBooks Online, that email still comes from QuickBooks. Check the invoice in QuickBooks if you want to confirm the photos are on it with Attach to email before you send.
Attachments are not included by default. You must manually select which attachments to include when creating the invoice. This helps prevent photos intended for internal use from being accidentally sent to customers.
If you use bulk invoicing, the preview has a single Include attachments checkbox instead of a picker. It adds all job attachments on the invoices, or none.
Only photos and files attached directly to the job can be added to an invoice. Attachments stored on the property (job site), including ones marked Show on jobs, do not appear in the invoice attachment picker.
If you need a property photo on an invoice, upload it to the job first (or upload it again on that job), then select it when you create the invoice.
Automatically add job attachments to new invoices
Section titled “Automatically add job attachments to new invoices”If you want every job attachment selected automatically when creating an invoice, turn on Automatically add job attachments to new invoices.
To turn this on or off:
- Choose your invoicing method:
- Xero: Settings → Integrations → Xero
- QuickBooks Online: Settings → Integrations → QuickBooks Online
- SortScape built-in invoicing: Settings → Invoicing → Invoices
- Find Automatically add job attachments to new invoices and turn it on or off.
This setting applies to all users in your account.
This is different from Invoice messages, which controls automatic invoice emails and reminders, not photo attachments.
Creating contacts and items in Xero or QuickBooks Online
Section titled “Creating contacts and items in Xero or QuickBooks Online”If the billing contact you specify does not already exist as a customer in the connected Xero or QuickBooks Online account, then a new customer will be created in that system.
If a material referenced on an invoice line item don’t exist as a product or service in the connected Xero or QuickBooks Online account then a new product will be created in that system.
Note for QuickBooks Online users:
- To add the service date to a QuickBooks Online invoice, enable QuickBooks service date? under Settings → Integrations → QuickBooks Online. The Service Date option should also be enabled in QuickBooks Online.
- For US customers that allow their customers to pay QuickBooks Online invoices electronically, you can allow invoices to be paid with online bank transfers or credit card by updating Allow online credit card payments and Allow online ACH payments? under Settings → Integrations → QuickBooks Online.
- The “service date” field on the QuickBooks Online invoice line item will be the date the SortScape job was completed.
Make a repeating job non-billable
Section titled “Make a repeating job non-billable”If one customer should not be invoiced, change that job, not your company job settings.
Settings → Jobs → Job settings only sets the default for new jobs you create later. It does not change an existing job, and it would make every new job non-billable.
- Open Schedule and click the job.
- If it is already complete, click Reopen.
- Click Edit.
- Under Invoice settings, turn off Requires invoicing.
- Click Update. On a repeating job, if SortScape asks which jobs to update, choose This and all future jobs so later jobs stay non-billable. Choose This job only to leave later jobs as they are. See Update one job in a repeating series. Past jobs stay as they are.
- If the work was already done, mark the job complete again. SortScape will not prompt you to create an invoice.
That is the non-billable setting for this job. Use it when a client does not require invoices going forward.
Setting the invoicing basis for a job
Section titled “Setting the invoicing basis for a job”Customers who started using SortScape before October 2024 read about the old method for setting the invoicing basis here.
When creating or editing a job, you can set how the job will be invoiced. When creating or editing a job you will see two checkboxes
Requires Invoicing - if this box is selected, you can create an invoice for this job from the job ⋮ menu (including before the job is marked complete) or from the Invoicing screen after the job is marked complete. If you don’t plan to create an invoice for this job then you can un-select this box so that you’re not prompted to invoice this job later.
Charge hourly based on time logged - this is for jobs billed on a time-and-materials basis. If this box is selected, any hours you log against the job will be invoiced at the hourly rate set. SortScape uses the job’s Estimated time (hours:minutes), just above Invoice settings, to add a line item with those estimated hours to the Invoice items section. When the job is marked complete, the line item will be updated with actual hours logged. This update happens before you create the invoice. Once a job has been invoiced, logged time and line items can no longer be changed unless you remove invoice status.
When more than one employee logs time on a job, their hours are added together. For example, if two employees each log 1 hour on a job charged at $130 per hour, the invoice charges 2 hours, or $260. There is no setting to charge one rate for the whole crew. If you want to charge for the time on site only once, have just one person log time on that job.
To control how logged hours are rounded on the invoice, choose your invoicing method:
- Settings → Invoicing → Invoices
- Settings → Integrations → Xero
- Settings → Integrations → QuickBooks Online
Change Round employee time to. Options are No rounding, 5 minutes, 15 minutes, 30 minutes, or 60 minutes. Each employee’s hours for a job are rounded up to the next selected minute block.
For more detail on the estimated time field, see Setting estimated time.
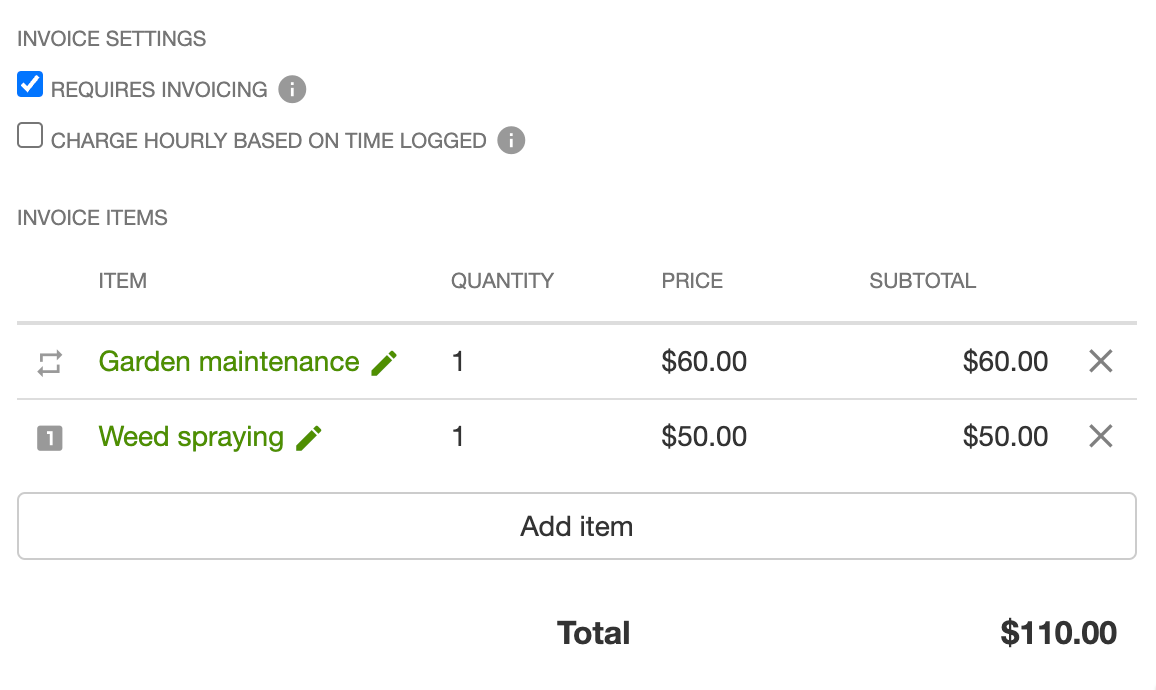
For example, if you estimate a job will take an hour at $60 per hour, then you will see a line item for the estimated amount of $60 as shown below:
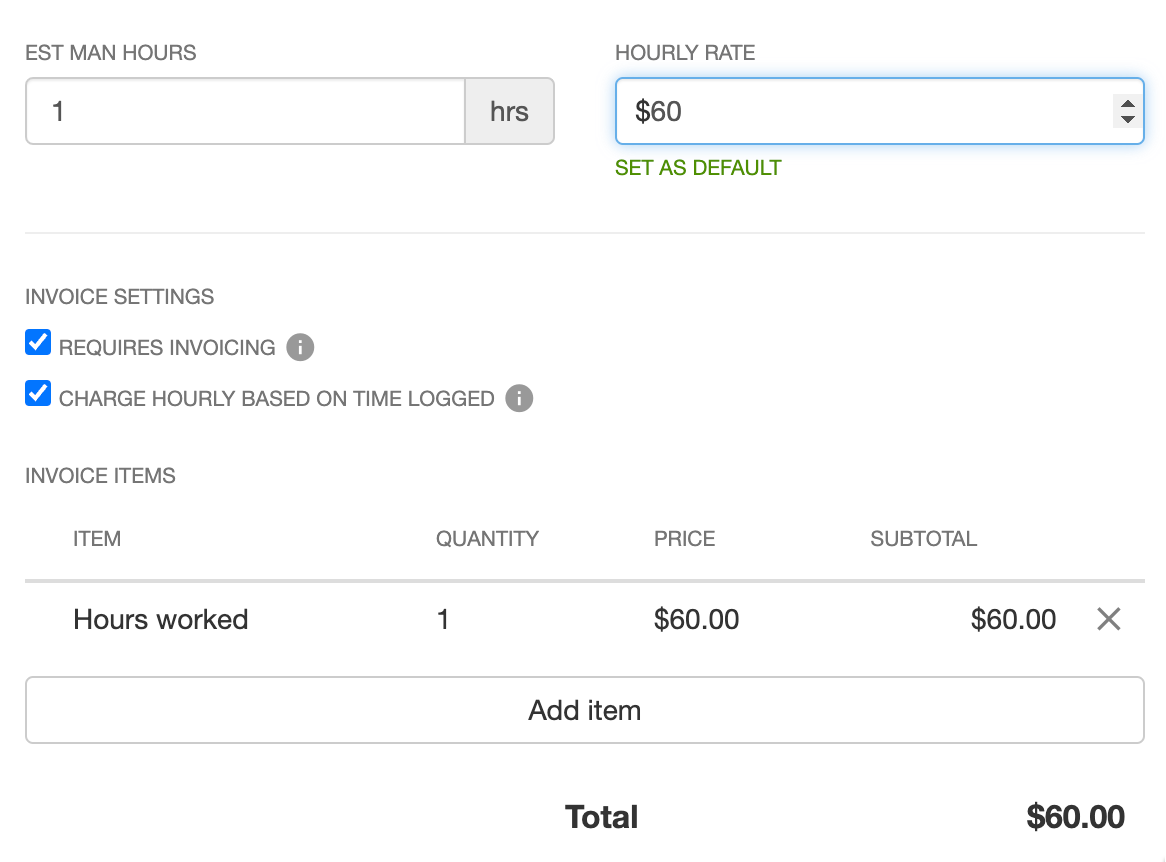
Once you mark the job complete then that 1 hour estimate will be replaced by the actual hours logged against the job either manually or by using the job timer. You can add or edit logged hours after marking a job complete, but only before the job has been invoiced. For example, if 1.5 hours were actually logged, then the job would look like the one below once it’s been completed:
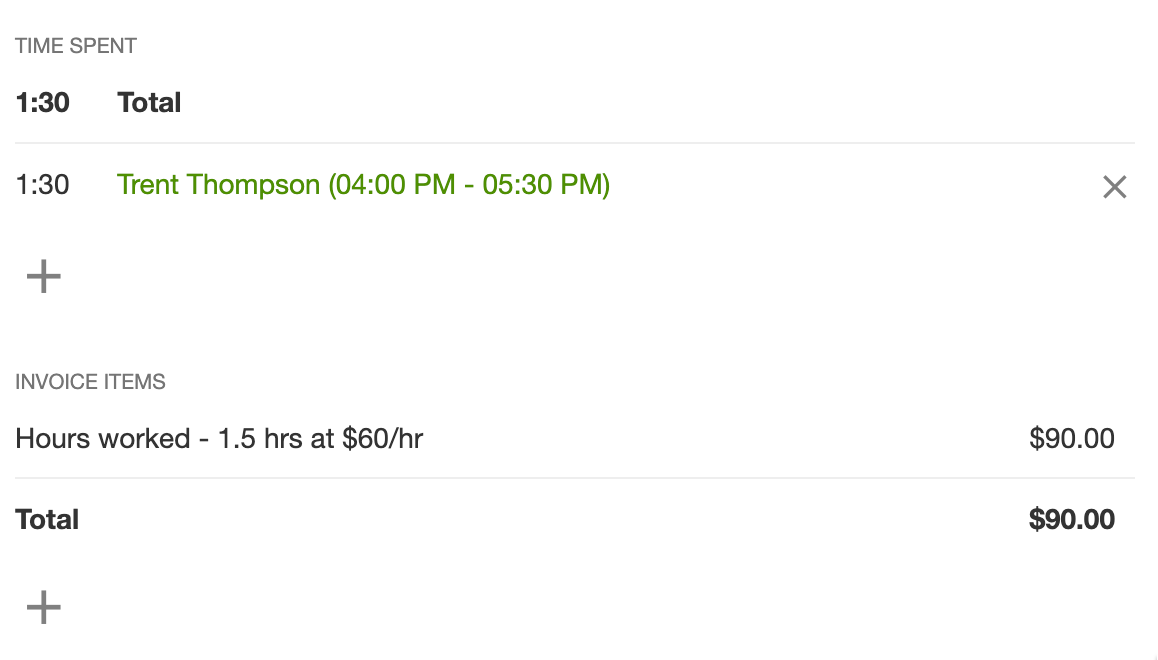
Invoice items lists all the line items that will be added to the invoice when you create it. To apply a discount on a job before invoicing, add a line item with a negative price (see Applying discounts).
To change the default name, price, or description that fills in when you pick an item (for example Weed killer), edit it in the Items catalogue, not on each job.
How invoice items affect schedule totals
Section titled “How invoice items affect schedule totals”Schedule Value totals (day, week, and month) come from each job, not from the invoice. At the bottom of the schedule you will see Total for the day, Total for the week, or Total for the month, with a Value column that adds up those job totals by crew.
- Open jobs use the job’s estimated value (invoice items, plus estimated hours for time-and-materials jobs).
- Completed jobs use the total of that job’s Invoice items. For time-and-materials jobs, the hours line switches to actual time logged when you mark the job complete.
The schedule does not use the invoice total. One invoice can include several jobs, and extra lines added only on the invoice are not tied to a particular job. SortScape cannot tell which of those invoice lines belong on which job.
If you need extra charges to show on the job and in the day/week totals, add them to the job’s Invoice items before you click Create invoice. Do not add them only on the invoice. See One-off charges on a single job.
Lines added only on the Create invoice preview appear on the invoice (and in Xero or QuickBooks Online). They do not appear on the job, in Property history, or in schedule Value totals.
Job cards on the schedule do not show dollar amounts on the card itself. Open a job to review its invoice items and total. For more detail, see Seeing estimated values on the schedule.
Change the price on all future jobs
Section titled “Change the price on all future jobs”To put a new price on a repeating job from now on (for example, raising your lawn mowing price to $55), change it once on the next job in the series.
- Open Schedule and click the next job for that property.
- Click Edit.
- Under Invoice items, change the price on the existing line item. It shows the circular repeating icon. You don’t need to delete it and add a new one.
- Click Update. If SortScape asks which jobs to update, choose This and all future jobs. To change the price on this job only, choose This job only. See Update one job in a repeating series.
If you chose This and all future jobs, the new price applies to that job and every later job in the series that isn’t completed yet. Completed and invoiced jobs keep their old price. Each repeating series has its own line items, so repeat these steps for every property (or every repeating series) that needs the new price. Changing the price in your items list (or in Xero or QuickBooks Online) only affects line items you add after the change.
Change the price with Edit, not while viewing the job. While viewing, Save changes that job only. If you remove a repeating line while viewing and choose All jobs in this repeating series, it is removed from every later job too. If later jobs have lost their line item this way, open the next job, click Edit, and add the line item back with the new price.
One-off charges on a single job
Section titled “One-off charges on a single job”To add an extra charge on one job (for example extra work or materials on top of a regular fixed-price maintenance job) without changing later jobs, the quickest way is to add a one-off line item while viewing that job.
- Open Schedule and click the job.
- Stay on the job. Do not click Edit for this step.
- In Invoice items, add a line item with the extra description and price.
- Confirm the new line item has a “1” icon. That means it applies to this job only.
You can also click Edit, add the line, and choose This job only when you click Update. Use Edit for anything else on one job, such as the price on a line that already repeats, estimated time or work required. See Update one job in a repeating series.
Add the extra line item on the job before you click Create invoice. Lines added only on the Create invoice preview appear on the invoice and in Xero or QuickBooks Online, but not on the job, in Property history, or in schedule Value totals.
How a new line is saved:
- Viewing a job (not in edit mode): the line is added to that job only. It shows a “1” icon.
- Edit, then This job only: the line stays on that job.
- Edit, then This and all future jobs (or Edit on the last open job in the series, where SortScape does not ask): the line is added to every later job in the series. It shows a circular repeating icon.
- Creating a repeating job: a new line is added to every job in the new series. It shows a circular repeating icon.
If extra materials (for example 15 bags of mulch) keep appearing on later jobs, they were added with Edit and applied to future jobs. Completing a job does not clear its line items, and dragging a job to another day keeps its one-off items with it. Neither action changes whether a line applies once or repeats. Delete the repeating line to remove it from future jobs, then add it again on the one job that should have it.
Invoice items missing on the job page?
Section titled “Invoice items missing on the job page?”The Invoice items section on a job (in view mode) only appears when time and materials tracking is enabled for your account. This is on by default.
If you open a job from Schedule and see General Instructions and work required, Issues, Attachments, and Work done, but no Invoice items, check:
- Open Settings → Time & materials → Settings.
- Confirm Time and materials tracking enabled is on.
When tracking is off, Invoice items may still appear when you Edit a job, but you cannot add one-off line items from the job show page the way this article describes. Re-enable tracking to restore that workflow.
See Time and materials administration.
Delete or cancel an invoice (SortScape built-in invoicing)
Section titled “Delete or cancel an invoice (SortScape built-in invoicing)”If you created an invoice in SortScape and want to remove it:
- Open Invoicing and go to the Invoices tab.
- Open the invoice.
- Click the ⋮ menu and select Delete.
- Confirm the deletion.
Deleting the invoice removes it from SortScape and returns any linked jobs to Jobs pending invoicing so you can invoice them again.
If you’ve already sent the invoice and only need to correct it, edit it instead. See Numbers are never reused.
Remove invoiced status on a job is different. It unmarks the job as invoiced but does not delete the invoice record. Use Delete on the invoice when you want to cancel it entirely.
You must be logged in as an Administrator to delete invoices.
Editing time or line items after a job has been invoiced
Section titled “Editing time or line items after a job has been invoiced”Once a job has been invoiced, whether you used Create invoice or Mark invoiced, the job is locked. You cannot add or remove logged time, materials, or invoice line items. This is about the job, not the invoice. If you invoice through Xero and there is no Edit button on the invoice, open it in Xero instead. See Editing an invoice after it has been emailed.
If you need to change the hours or line items after invoicing:
- Open the job.
- Select Remove invoiced status.
- Make your changes (add or edit logged time, materials, or invoice line items).
- When finished, create the invoice again or use Mark invoiced.
This unmarks the job as invoiced. It does not delete a SortScape invoice record. To remove the invoice entirely, use Delete on the invoice (Invoices tab → open invoice → ⋮ → Delete).
For jobs billed hourly based on time logged, hours can be added or edited after the job is marked complete, but only before the job has been invoiced. The invoice line item updates to reflect actual logged hours when the job is marked complete — not after an invoice has already been created.
Setting invoice due dates
Section titled “Setting invoice due dates”Where the invoice due date comes from depends on how you invoice:
- SortScape built-in invoicing: set the company default due date under Settings → Invoicing → Invoices. You can also override payment terms on an individual contact. See Setting invoice due dates and Setting invoice defaults for a contact.
- Xero or QuickBooks Online: the due date is controlled in your accounting system, not in SortScape. See Setting invoice due dates for details.
Tax treatment of invoices
Section titled “Tax treatment of invoices”Tax on jobs vs invoices
Section titled “Tax on jobs vs invoices”Job line items show the price only. GST or other tax is not shown on the job.
Tax is added when you create the invoice:
- SortScape built-in invoicing: from your invoice tax settings under Settings → Invoicing → Invoices, or from tax defaults on the billing contact. See Setting invoice defaults for a contact.
- QuickBooks Online: from the GST inclusive setting under Settings → Integrations → QuickBooks Online, and from the tax settings on each QuickBooks Online product / service. See Invoice tax handling in QuickBooks Online.
- Xero: from the tax defaults and account codes in your Xero organisation. See Invoice tax handling in Xero.
If you scheduled a job from a quote that included tax, the job still shows the line prices without tax. That is expected. You do not need to change the job price to include tax.
SortScape built-in invoicing
Section titled “SortScape built-in invoicing”Set your company Default tax rate and Default tax treatment under Settings → Invoicing → Invoices. To use different tax settings for one customer, override them on that contact. See Setting invoice defaults for a contact.
When an invoice is headed “Tax invoice” or “Invoice”
Section titled “When an invoice is headed “Tax invoice” or “Invoice””With SortScape built-in invoicing, the heading on the invoice PDF and on the online invoice your customer opens is either Tax invoice or Invoice. SortScape sets this automatically from the invoice’s tax treatment and line items, so the wording matches what a GST-registered business is expected to send. There is no separate switch for it.
An invoice is headed Tax invoice when both of these are true:
- The invoice tax treatment is Tax inclusive or Tax exclusive (that is, not No tax), and
- The invoice has a GST amount, or it has at least one line item using the GST Free tax rate.
An invoice is headed Invoice when either of these is true:
- The invoice tax treatment is No tax, or
- The invoice tax treatment is tax inclusive or tax exclusive, but there is no GST on the invoice and no line items use the GST Free tax rate.
This follows how GST works in Australia. A business registered for GST issues a tax invoice, and a sale can still be on a tax invoice when the item itself is GST free (for example some food or health services), as long as the business is GST registered. A business that is not registered for GST should not issue a tax invoice, so setting the tax treatment to No tax keeps the heading as Invoice.
To change which heading an invoice gets, set the tax treatment:
- For every customer, set the company Default tax treatment under Settings → Invoicing → Invoices.
- For one customer, override Invoice tax treatment on that contact. See Setting invoice defaults for a contact.
Where the heading appears
Section titled “Where the heading appears”The Tax invoice heading is used in the two places your customer actually receives:
- The invoice PDF (including the PDF attached to invoice emails).
- The online invoice your customer opens from the emailed link.
Two other places always read Invoice, whatever the tax treatment:
- The invoice screen inside SortScape that you view as the business.
- The body of the invoice email itself, above the invoice summary.
So if you are checking the email body or your own invoice screen and see Invoice, open the attached PDF or the online invoice before assuming the wording is wrong. On a GST-registered account, the PDF usually already reads Tax invoice.
QuickBooks Online
Section titled “QuickBooks Online”GST for QuickBooks Online invoices is set on Settings → Integrations → QuickBooks Online, not on the Invoices settings page. See Invoice tax handling in QuickBooks Online.
Xero invoices
Section titled “Xero invoices”By default, SortScape creates invoices in Xero as Approved, so they show in Xero as awaiting payment. To create them as drafts instead, change Default invoice status. This is a SortScape setting, not a Xero one, and you must be an Administrator:
- Open Settings → Integrations → Xero.
- Click Edit next to Invoice settings.
- Set Default invoice status to Draft or Awaiting Approval, depending on your Xero invoicing workflow, then click Update.
New invoices then stay unapproved in Xero until someone approves or sends them there. The change does not affect invoices already in Xero.
If Xero reports You have reached the limit of invoices you can approve, the Xero organisation has used its monthly invoice allowance. Invoices SortScape creates count toward that allowance. See You have reached the limit of invoices you can approve.
Whether a Xero invoice is tax inclusive or exclusive, the tax rate on each line, the account code on new Xero products, and tax-exempt customers are all set in Xero. See Invoice tax handling in Xero.
Notes on invoices
Section titled “Notes on invoices”When you create an invoice from jobs, SortScape fills in the Notes box for you. By default it shows the property address, the job date and the Work done from the job. If the property has a billing reference, that goes at the top of the notes (see Adding a billing reference to invoices).
Notes print below the line items on the PDF and the online invoice. To change or remove them with SortScape built-in invoicing:
- Open Invoicing → Invoices and open the invoice.
- Click Edit.
- Change or clear the Notes box.
- Save the invoice.
You can do the same on the new invoice form before you save it. Clearing the notes on one invoice does not change other invoices. If you want different default notes on every new invoice (for example, no work done), contact SortScape support.
Adding a billing reference to invoices
Section titled “Adding a billing reference to invoices”Sometimes your clients require you to provide an account number, client number or reference code on the invoices you send them. For this case, we have a “billing reference” field which can be set for each property. The “billing reference” will get added to any invoices that get created for that property.
If you are sending invoices through Xero, the billing reference will get added to the “reference” field at the top the Xero invoice.
If you are sending invoices through SortScape or QuickBooks Online, the billing reference will get added to the customer notes field at the bottom of the invoice.
To change the billing reference, edit the property and update the contents of the “billing reference” field.
Do not use Billing reference for your own WorkCover number, ABN, or licence. That field is for a code the client wants on invoices for that property.
To put your own details on every SortScape invoice, use Company details (shows with your company name) or Payment instructions (shows at the bottom). To show or hide item names on invoice lines with SortScape built-in invoicing, use Show item names on line items. That toggle is not available if you invoice through QuickBooks Online or Xero.
Under What customers see on Settings → Invoicing → Invoices, you can also set whether new SortScape invoices show quantities and unit prices. Xero and QuickBooks invoices do not use these settings. See Choosing what customers see on quotes and invoices and FAQ - How can I edit my invoice template?.
Running an end-of-year invoice report
Section titled “Running an end-of-year invoice report”At the end of the year, your accountant may require a report of all the invoices created or paid during the year. If you are using Xero or QuickBooks Online, this report can be run within those systems.
If you are using SortScape built-in invoicing, you can also download the Sales and tax report (.xlsx) from the invoice list export menu. It includes invoice, payment, and tax summaries for a selected period. See Sales and tax report (Excel export).